I love cooking. I love choosing ingredients, tasting and making changes as I go. I like the control I have to save a dish that isn’t quite where it needs to be.
Baking, is another story. I find all the steps involved in baking tedious and I hate that you really can’t taste as you go. All that work and mess and there is still no guarantee that it will be worth your while when you finally get to take your baked goods out of the oven.
These feelings are closely mirrored in my thoughts on crafting and DIY projects. I love a good DIY- as long as I am not the one that has to do it! All the steps to get the project “just right” kind of overwhelm me. Not to mention it often takes lots and lots of work and time before you see the finished product. And as my baking skills are closely related to my DIY skills, the quality of the finished product is not guaranteed!
I am more of a low-key crafter. My projects need to be short and sweet. They certainly can’t require perfection. As when I am cooking, I need to have the flexibility to make changes as I go without ruining the entire thing. And preferably I can finish them during a single naptime.
All that to say….I decorated my washer and dryer. With washi tape. It was easy, it was fun, and I finished during naptime. And even though I think the silent consensus of my loved ones is that I am crazy, I like it anyway!
I picked up some washi tape in a coordinating 2-pack at Hobby Lobby. They happened to be on sale for a little over $2, and I have a lot leftover, so it was a pretty tiny investment.
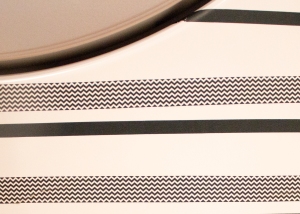
Here is a close up of the washer:
At first I just had the chevron tape, but I thought that was lacking a little something on its own. I added the solid stripe and I am happy with the way it sort of grounds the busy chevron print.
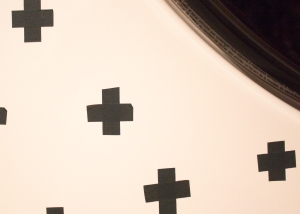
Here is a close-up of the dryer:
So, here is the deal with the dryer. I wanted to do something completely different on the dryer because a) the chevron is a little overwhelming in large doses I think, and b) I saw someone do a Swiss army cross print on their wall and thought, “hey, why not on my dryer”?
I am definitely embracing imperfection on this one because the Swiss cross print is not as simple as it seems. It is tricky to get all the pieces of tape the same length and they all need to be really short. This might not be as tricky if you relish in tedious, detail oriented projects but as I already mentioned, that is just not my forte.
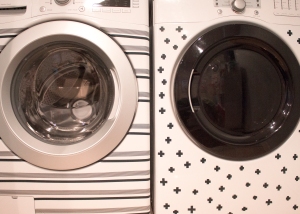
Here is the finished set, in all its mismatched glory:
We used to have a matching set until the three year old washing machine unexpectedly bit the dust. I really let it bother me that we no longer had a matching set until I realized how ridiculous that was. It just gives me more practice in embracing imperfection. However, I can’t decide if the tape makeover distracts from or emphasizes the fact that the two appliances aren’t from the same set any more. Either way, I like the two prints together.
This was a super easy, low cost, high impact project. My tape has been on for two weeks with no problems with peeling or anything. I would say that if you want to give any DIY project a try, this is about as low-risk as you are going to get!
More easy changes are in store for this little laundry nook of mine. Stay tuned!
Want to see another one of my crazy decorating choices? Here’s a post about that time I bought an elephant head- and why you might want to too!


LOVE IT!!!
LikeLike
Thanks April!! I am hoping if I decorate the laundry space enough it won’t seem like such a chore!
LikeLike